Django - connect to Mysql database & CRUD APIs
It is easy to connect to Mysql database from Django project. You have to create a database in XAMPP using PhpMyAdmin. Then open settings.py file in djsite/djsite folder. Change the following json values to your database credentials.
In the jobform folder, open models.py file and add the following code to create JobForm model.
The model have the following data fields:
- id (auto generated field)
- first_name
- last_name
- dob
- sex
- email
- education (selection field)
- position (selection field)
- fileatt
- submit_date
- user_id
A job form belongs to an authorized user. Thus, we add user as a foreign key in the jobform table to make the relationship between the jobform and user table.
models.py
The model will map to the jobform_jobform table in Mysql database.
In the settings.py add the jobform app to installed apps of the django project as below:
To create migration file for the model, issue the command: python manage.py makemigrations. The command will generate a migration file in the jobform/migrations folder.
Then run python manage.py migrate to create the table in Mysql database.
Now our database is ready. We are going to add sample data to the table using Django REST framework interface. Execute the following command to install rest framework:
In the jobform folder, create serializers.py file and add the following content:
Serializer in Django helps you easily convert model objects and/or querysets in to JSON formats than can be parsed by your client app like React or Angular.
Open the views.py file and modify its content to the following:
DATABASES = {
    'default': {
        'ENGINE': 'django.db.backends.mysql',
        'NAME': 'database name',
        'USER': 'database user',
        'PASSWORD': 'database password',
        'HOST': 'localhost',
    }
}
In the jobform folder, open models.py file and add the following code to create JobForm model.
The model have the following data fields:
- id (auto generated field)
- first_name
- last_name
- dob
- sex
- education (selection field)
- position (selection field)
- fileatt
- submit_date
- user_id
A job form belongs to an authorized user. Thus, we add user as a foreign key in the jobform table to make the relationship between the jobform and user table.
models.py
from django.db import models from django.contrib.auth.models import User from datetime import datetime # Create your models here. class JobForm(models.Model): class Meta: verbose_name = u'JobForm' verbose_name_plural = u'JobForms' MALE = 'male' FEMALE ='female' SEX_CHOICES = [ ('F', FEMALE), ('M', MALE), ] MANAGER = 'manager' SALES ='sales' CASHIER = 'cashier' OTHER ='other' POSITION_CHOICES = [ (1, MANAGER), (2, SALES), (3, CASHIER), (4, OTHER), ] HIGHSCHOOL = 'High School' ASSOCIATE = 'Associate' BACHELOR = 'Bachelor' EDUCATION_CHOICES = [ (1, HIGHSCHOOL), (2, ASSOCIATE), (3, BACHELOR), ] EMPLOYED = 'employed', SELFEMPLOY = 'self-employed', UNEMPLOYED = 'unemployed', STUDENT = 'student', EMPLOYMENT_CHOICES = [ (1, EMPLOYED), (2, SELFEMPLOY), (3, UNEMPLOYED), (4, STUDENT), ] first_name = models.CharField(max_length=20,verbose_name='First Name') last_name = models.CharField(max_length=20,verbose_name='Last Name') email = models.EmailField(max_length = 254, default='') sex = models.CharField( max_length=5, choices=SEX_CHOICES, default=SEX_CHOICES[0], ) dob = models.DateTimeField(default = datetime.now, blank = True,verbose_name='Date Of Birth') education = models.IntegerField( choices=EDUCATION_CHOICES, default=1, ) position = models.IntegerField( choices=POSITION_CHOICES, default=1, ) employment = models.IntegerField(fileatt = models.FileField(upload_to='documents/',blank=True,verbose_name='Files attachment') submit_date = models.DateTimeField(default = datetime.now, blank = True,verbose_name='date submitted') user = models.ForeignKey(User, on_delete=models.CASCADE) def _str_(self): return self.first_namechoices=EMPLOYMENT_CHOICES,default=1,)
The model will map to the jobform_jobform table in Mysql database.
In the settings.py add the jobform app to installed apps of the django project as below:
# Application definition

INSTALLED_APPS = [
    'django.contrib.admin',
    'django.contrib.auth',
    'django.contrib.contenttypes',
    'django.contrib.sessions',
    'django.contrib.messages',
    'django.contrib.staticfiles',
    'jobform',
]
To create migration file for the model, issue the command: python manage.py makemigrations. The command will generate a migration file in the jobform/migrations folder.
Then run python manage.py migrate to create the table in Mysql database.
Now our database is ready. We are going to add sample data to the table using Django REST framework interface. Execute the following command to install rest framework:
pip3 install djangorestframeworkIn the jobform folder, create serializers.py file and add the following content:
from rest_framework import serializers
from .models import JobForm

class JobFormSerializer(serializers.ModelSerializer):
    class Meta:
        model = JobForm
        fields = ('id', 'first_name', 'last_name','sex','dob','email','education','position','fileatt','user_id')
Serializer in Django helps you easily convert model objects and/or querysets in to JSON formats than can be parsed by your client app like React or Angular.
Open the views.py file and modify its content to the following:
from django.shortcuts import render
from rest_framework import viewsets
from .serializers import JobFormSerializer
from .models import JobForm
# Create your views here.
class JobFormView(viewsets.ModelViewSet):

    serializer_class = JobFormSerializer
    queryset = JobForm.objects.all()
We define JobFormView class and specify ModeViewSet as parameter. The ModelViewSet has predefined actions to list, add, update, and delete records from the database. To access the view from the browser, you have to add the view to the urls.py file in djsite/djsite folder.
djsite/urls.pyfrom django.contrib import admin from django.urls import path, include from rest_framework import routers from jobform import views
router = routers.DefaultRouter()
router.register(r'jforms', views.JobFormView, 'jobform')
urlpatterns = [
    path('admin/', admin.site.urls), # admin panel
    path('api/', include(router.urls)), #api/jobforms - api to access JobFormView
]
Then add the rest_framework to the setting.py file.INSTALLED_APPS = [ 'django.contrib.admin', 'django.contrib.auth', 'django.contrib.contenttypes', 'django.contrib.sessions', 'django.contrib.messages', 'django.contrib.staticfiles', 'rest_framework', 'jobform',]From the root folder of the project (djsite), execute the command below to run the project on port 5000:
python manage.py runsever 5000
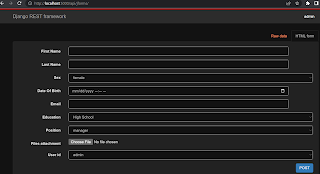
Then you can access the job form app via Django REST framework interface at http://localhost:5000/api/jforms. In the page, you see records added to the database and able to insert new records. Let add some sample job form data to the form and click post to save data in the database.

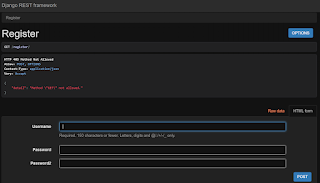
To update or delete a particular job form, you append slash and job form id to the url. For example, to update a job form of id 1, access http://localhost:5000/api/jforms/1. This will load all data of the job form record to an editable form that you can use PUT to update the record to the database, and DELETE to remove the record from the database.

Comments
Post a Comment